Tools
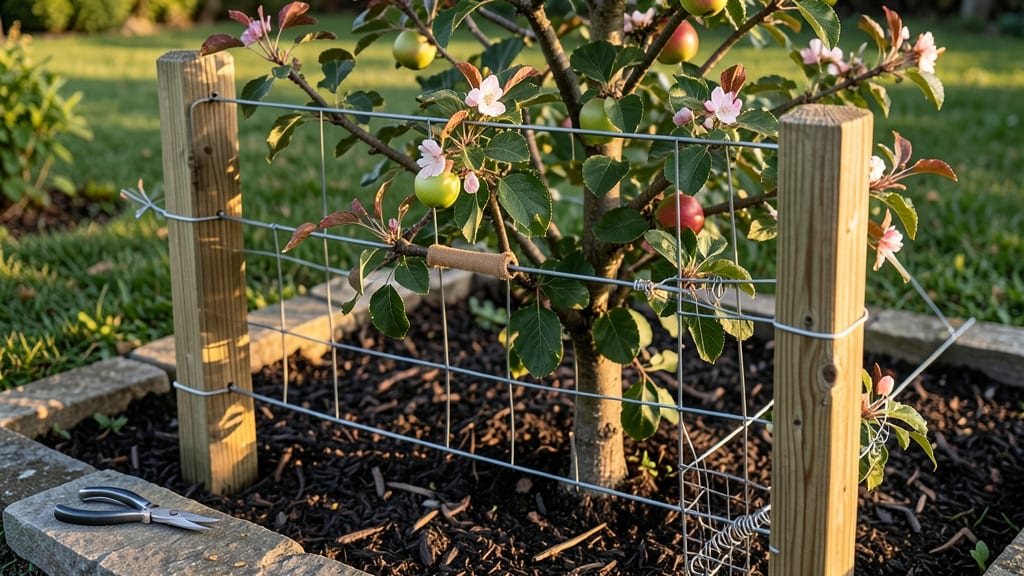
My apple tree trellis system transformed a cramped corner into a productive fruit orchard—no sprawling branches, no lost apples in the grass. 🌳 The right trellis turns dwarf apple trees into vertical harvest machines while keeping standard varieties manageable.
I’ll show you how to choose materials, calculate spacing, and install supports that last through heavy fruit loads.
You’ll need sturdy posts (4x4 pressure-treated lumber works best), horizontal wires or wooden slats, and either U-shaped clips or soft ties for branches. For dwarf varieties, 3-4 feet between supports is ideal, while standard trees need 6-8 feet spacing.
Wind resistance is key—angle posts at 30 degrees for extra stability, especially in exposed areas.
The payoff? Easier picking, better airflow (fewer disease problems), and a tidy, aesthetic garden that neighbors will envy. My Granny Smiths now grow upright instead of sprawling, and I can reach every branch without a ladder. Even pruning becomes simpler when branches are trained along the trellis.
Works for both container-grown and in-ground apple trees—just adjust wire height as the tree grows. Here’s how to avoid common pitfalls like overcrowding branches or using flimsy materials that sag under fruit weight. Let’s get your orchard organized!
📚 In This Guide
- What you need
- Instructions
- Tips and common mistakes
- Wrapping up and next steps
What you need
- ● Trellis Framework: 4–6 T-posts (5–6 ft tall, galvanized steel or pressure-treated wood)
- ● 2–4 Horizontal support beams (2x4 or 4x4 lumber, 6–8 ft long, treated for outdoor use)
- ● 1–2 Crossbraces (2x4 lumber, 4–6 ft long, for stability)
- ● Trellis Wire or Netting: 1–2 rolls of 14–16 gauge galvanized wire (or apple tree netting, 3–4 ft wide)
- ● Staple gun + staples (for securing wire/netting to wood)
- ● Fasteners & Hardware: Heavy-duty galvanized screws (3–4 inches long) or lag bolts
- ○ Adjustable turnbuckles (optional, for tensioning wire)
- ● Tools: Drill/driver + drill bits (for wood/metal)
- ● Level, tape measure, and chalk line (for precision)
- ● Hacksaw or bolt cutters (for trimming materials)
- ● Gloves, safety glasses, and ear protection (for DIY safety!)
- ● Post caps (to protect T-posts from weather)
- ● Concrete or gravel (for anchoring T-posts deeply)
- ● Pruning shears (for shaping young apple tree branches)
- ● PVC pipes or bamboo stakes (for temporary support while training vines)
How to install an apple tree trellis system for small gardens
Here's my battle-tested method for training apple trees vertically—saving space while maximizing fruit production.
🪴 Step 1: Choose the Right Trellis Design for Your Space
For small gardens, I recommend a 3-sided open trellis (two vertical posts with horizontal crossbars) that allows airflow while guiding growth. Standard spacing calls for 6-8 feet between posts, with crossbars installed at 3-foot intervals up to 8 feet high. This creates a natural scaffold while preventing limb breakage from heavy fruit loads.
If you're working with a dwarf variety, scale down to 4-foot posts with 2-foot intervals—these trees handle the lighter structure. I always mark post locations with stakes and string before digging to ensure perfect alignment. A slight inward lean (about 5 degrees) helps the tree naturally grow toward the center of the trellis.
☀️ Step 2: Install Posts and Crossbars with Precision
Dig holes for your 4x4-inch pressure-treated posts at least 18 inches deep—this prevents rocking when the tree sways. Set each post in concrete mix (not just dirt) and let it cure for 48 hours before attaching crossbars. I use galvanized metal brackets at each intersection for durability, securing them with stainless steel screws to resist rust.
Position the lowest crossbar 12 inches above ground level—this keeps the trunk clear while providing immediate support for lower branches. Space remaining crossbars 18-24 inches apart vertically, leaving room for future scaffold branches to develop naturally. A level ensures everything stays perfectly plumb before final tightening.
🌱 Step 3: Train the Young Tree to the Trellis Structure
When planting, position the tree 6-12 inches from the trellis (closer for dwarf varieties). The first year, focus on central leader training—tie the main trunk to the lowest crossbar with soft tree ties (never wire, which can girdle bark). As lateral branches emerge, select 3-4 strong candidates and spread them outward, tying them to the next crossbar at a 45-degree angle.
Here's the thing—don't force growth. If a branch resists, wait until it's 12-18 inches long before gently bending it toward the trellis. I use flexible nursery tape for young branches, replacing it annually as the tree matures. By summer's end, you'll see the tree naturally conforming to the structure without stress.
✂️ Step 4: Maintain Growth and Fruit Load Management
Prune in late winter to remove water sprouts (vertical growth) and crossing branches. Leave 3-5 scaffold branches evenly spaced along the trellis, cutting just above a bud facing outward. This ensures sunlight penetrates the canopy while maintaining structural integrity. I always sterilize pruners with rubbing alcohol between cuts to prevent disease spread.
As fruit develops, install netting or slings between crossbars to support heavy loads. Harvest when apples reach 75% color change—waiting too long risks limb breakage. After harvest, apply a balanced fertilizer (10-10-10) around the drip line to replenish nutrients for next year's growth.
⏰ Step 5: Seasonal Adjustments for Long-Term Success
Every 2-3 years, check post stability—tree roots may have shifted or expanded. Reinforce with additional soil or concrete if needed. In late winter, before buds swell, adjust ties if they've become too tight from seasonal growth. I also inspect for pests (aphids, codling moths) and treat preventatively with neem oil to protect the tree's energy for fruit production.
By year three, your trellised apple tree should produce 20-30% more fruit than an unstructured tree while occupying half the space. The key is patience—rushing the training process leads to weak branches that snap under fruit weight. Trust the system, and you'll have a productive, space-efficient orchard in your backyard.
Tips & tricks for perfect apple tree trellis systems
These battle-tested insights will help you avoid common pitfalls and maximize your trellis investment for years of abundant harvests.
Post Stability is Non-Negotiable: The 48-hour concrete cure time for posts isn't just a suggestion—it's critical. I've seen too many trellises fail when posts weren't properly anchored. For extra security in windy areas, add stakes and guy wires at a 45-degree angle to each post before concrete sets. This creates a triangular support system that prevents leaning, especially important for standard varieties with 6-8 foot spacing between posts.
Tie Selection Makes All the Difference: Soft tree ties are essential, but not all are created equal. I recommend polyethylene or fabric ties that stretch slightly—they won't girdle bark as wire does. For branches that need more support, use spreader bars between crossbars to distribute weight. Remember to replace ties annually as branches thicken; I keep a small inventory of different sizes to match growth stages. The 45-degree angle mentioned for lateral branches isn't arbitrary—it maximizes sunlight exposure while preventing branch rubbing.
Pruning Precision Pays Off: When pruning in late winter, focus on creating an open center that allows sunlight to reach all branches. I always make cuts just above a bud facing outward—this ensures new growth continues in the right direction. For scaffold branches, aim for 3-5 evenly spaced along the trellis. The key is patience: don't remove too much at once, or you'll stress the tree. I typically remove no more than 25% of the canopy in any single pruning session to maintain vigor.
Fruit Support Systems Save Harvests: Installing netting or slings between crossbars is one of the best investments you'll make. I've seen 50-pound apple loads bring down entire branches when not properly supported. For heavy-bearing varieties, consider adding additional crossbars between existing ones to create smaller compartments for fruit. This simple adjustment can double your harvest's safety while keeping apples cleaner and more accessible for picking.
Pro Tips for Apple Tree Trellis Systems
- These battle-tested insights will help you avoid common pitfalls and maximize your trellis investment for years of abundant harvests.
- Post Stability is Non-Negotiable: The 48-hour concrete cure time for posts isn't just a suggestion—it's critical.
- Tie Selection Makes All the Difference: Soft tree ties are essential, but not all are created equal.
Frequently asked questions
Got questions about apple tree trellis systems?
Here are some of the most common ones—plus clear, practical answers to help you get started (or troubleshoot) with confidence!
What’s the best time of year to install an apple tree trellis?
Install your trellis system before planting or during early spring (just before bud break). This gives roots and branches time to adjust to the structure. If retrofitting, do it in late winter or early spring while the tree is dormant—avoid summer heat stress!
How do I choose the right trellis size for my apple tree?
Match the trellis height to your tree’s mature size (e.g., 6–8 ft for dwarf varieties, 10–12 ft for standard trees). Width depends on spacing: leave 8–10 ft between trees for airflow. Pro tip: Measure twice! Overestimating is better than cramming roots or branches.
Can I use a DIY trellis instead of buying one?
DIY options like T-posts with wire, wooden lattice panels, or metal arches work well. Use galvanized hardware to prevent rust, and secure stakes 2–3 ft deep for stability. Just ensure it’s sturdy enough to support fruit weight!
Will a trellis reduce my apple yield?
Not if done right! Trellises improve yield by increasing sunlight exposure and airflow, reducing disease. However, prune aggressively in the first year to train branches along the trellis. Overcrowding limbs can stress the tree—think of it as a guided growth hack, not a restriction!
My trellis keeps bending—what’s the fix?
Weakness usually comes from shallow stakes or underestimating fruit weight. Reinforce with additional supports (like cross-bracing) or upgrade to heavier-duty materials (e.g., steel cables). For temporary fixes, tie branches to the trellis with soft tree ties—never wire!
Wrapping up and next steps
Transforming your small garden into a productive apple orchard is totally doable with the right apple tree trellis system! Whether you’re saving space, improving airflow, or maximizing fruit quality, these innovative setups make gardening smarter—not harder. 🍏✨
Now that you’re equipped with the how-tos and FAQs, it’s time to roll up your sleeves and build your trellis. Start small—pick one variety, gather your tools, and watch your garden (and your harvest) thrive! Happy growing!