
Pruning
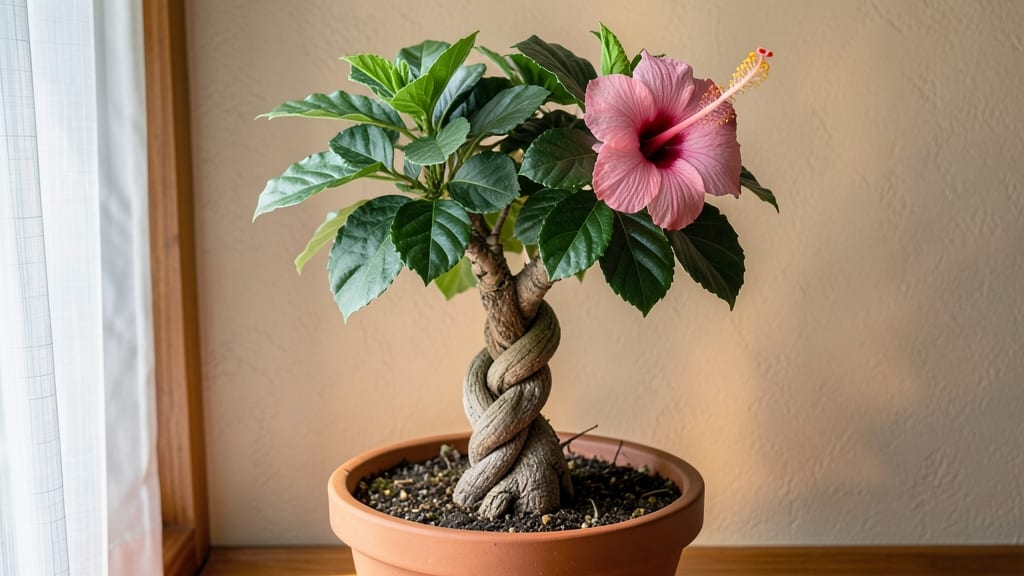
A braided hibiscus tree indoors transforms your living space into a tropical sanctuary with delicate, woven trunks that feel like a living work of art. 🌿 I’ve struggled with keeping these plants alive—until I learned the secrets of light, water, and pruning that actually work indoors.
The key isn’t just braiding; it’s creating the right conditions for the plant to thrive while you shape it. You’ll need a young hibiscus (or similar braidable plant), a sunny window or grow light, well-draining soil, and a 10-15 gallon pot to give roots room to grow.
Humidity is your best friend here—mist the leaves or place the pot on a tray of pebbles and water to mimic the tropical environment these plants crave. Overwatering is the silent killer, so let the top inch of soil dry out between waterings.
Once you’ve got the basics down, the braiding process becomes oddly satisfying. Start with three main trunks, gently twist them, and secure them with soft ties every few inches.
Prune back any leggy growth to encourage bushier foliage, and watch as your hibiscus grows into a lush, canopy-topped masterpiece that fills your space with vibrant blooms. This method works for small apartments or sunrooms, and with patience, you’ll have a plant that’s as stunning as it is low-maintenance.
Let’s get those trunks braided!
📚 In This Guide
- What you need
- Instructions
- Tips and common mistakes
- Wrapping up and next steps
What you need
- ● Hibiscus plant(s): 3–5 healthy, similar-sized hibiscus plants (dwarf varieties like Hibiscus rosa-sinensis or Hibiscus syriacus work best). Ensure they’re disease-free and have flexible stems.
- ● Pruning shears: Sharp, sterilized shears (bypass pruners recommended) for clean cuts.
- ● Support structure: Option 1: A sturdy wooden dowel (1–1.5" diameter, 3–4 ft long) or a bamboo stake.
- ● Option 2: A pre-made braiding frame (available at garden centers).
- ● Tying materials: Jute twine or soft garden twine (3–4 yards, ¼" width).
- ○ Optional: Velcro plant ties or stretchy tree ties for easier adjustments.
- ● Potting mix: Well-draining, peat-based mix (or cactus/succulent blend) for hibiscus.
- ● Container: A large, shallow pot (12–16" diameter) with drainage holes for the base of your braided tree.
- ● Gloves: Gardening gloves to protect hands from thorns and sap.
- ● Hydrogen peroxide (3%) or rubbing alcohol to sterilize tools.
- ● Spray bottle: With water for misting stems during braiding (keeps them pliable).
- ● Patience & space: A well-lit area (bright indirect light) and 2–3 hours for initial setup.
- ○ Optional extras: Plant food (balanced liquid fertilizer for hibiscus).
- ● Decorative pot cover or moss for a polished look.
- ● Mini trellis or stakes for extra support during growth.
Step-by-Step instructions for training a hibiscus braided tree indoors
This method transforms a single hibiscus plant into a stunning, space-saving braided tree—ideal for small apartments.
🌱 Step 1: Select and Prepare Your Hibiscus Starter Plant
Start with a healthy hibiscus plant that has at least three strong stems emerging from the base—these will become your braids. Choose a variety with flexible, semi-woody stems like Hibiscus rosa-sinensis or Hibiscus syriacus. If your plant has only one main stem, propagate two additional cuttings in water until they root.
Trim any existing leaves from the lower 6-8 inches of each stem. This prevents leaf damage during braiding and encourages new growth at the base. Water the plant lightly the day before braiding—you want the soil slightly moist but not soggy, as flexible stems braid more easily when slightly hydrated.
✂️ Step 2: Braid the Three Stems Together
Gently remove the plant from its pot and arrange the three stems side by side. Hold the stems at the base where they emerge from the soil, then cross the right stem over the middle stem, followed by the left stem over the new middle (right stem). This creates your first "X" pattern. Repeat this crossing every 2-3 inches along the length you want braided.
Secure each braid with a soft plant tie or twist tie (avoid wire—they can cut into stems). I like to space the ties 4-6 inches apart to give the stems room to thicken naturally. Leave the top 4-6 inches unbraided so the plant can grow upward freely. If a stem feels too stiff to bend, gently warm it with a hairdryer on low heat for 10-15 seconds—this makes it pliable without damaging the plant.
🪴 Step 3: Repot and Train for Structure
Repot the braided hibiscus into a slightly larger container (just 1-2 inches wider than the current pot) using well-draining potting mix. Hibiscus roots need oxygen, so avoid heavy garden soil. Place the braided base at the center of the pot and fill around it, pressing lightly to eliminate air pockets. Water thoroughly until water runs out the drainage holes.
After repotting, stake the hibiscus with a 3-foot bamboo stake placed next to the braided trunk. Use soft ties to loosely secure the top of the plant to the stake—this prevents the weight of new growth from pulling the braids apart. Position the plant in bright, indirect light (east or west-facing window) for the first 2-3 weeks while it adjusts to its new structure.
☀️ Step 4: Maintain Light, Water, and Pruning for Growth
Hibiscus braided trees need 4-6 hours of direct sunlight daily to thrive. If your space lacks sufficient light, supplement with a grow light placed 12-18 inches above the plant. Rotate the pot a quarter turn weekly so the braids grow evenly toward the light. You’ll notice new growth emerging from the base—these are the leaves that will fill out your canopy.
Water when the top 1-2 inches of soil feel dry to the touch. Hibiscus plants are drought-tolerant but hate soggy roots, so always check moisture before watering. Feed with a balanced liquid fertilizer (10-10-10) every 4-6 weeks during spring and summer to encourage lush foliage. Prune any stems that grow outside the braided structure by pinching them back at the base—this keeps the design clean and encourages fuller growth within the braids.
⏰ Step 5: Strengthen and Refine Over Time
After 3-4 months, the braids will start to thicken naturally as the stems mature. If any ties dig into the stems, replace them with wider, softer ties. Continue training new growth by gently weaving any stray stems back into the braid as they emerge. By 6-8 months, your hibiscus braided tree will have a full, layered canopy while maintaining its elegant structure.
In winter, reduce watering and fertilizing—hibiscus enter a dormant phase. Move the plant to a cooler spot (55-65°F) if possible, but keep it in bright light. If your braids loosen over time, simply retie them gently using the same crossing pattern. With patience, your hibiscus braided tree will become a stunning, conversation-starting centerpiece that fits any small space.
Tips & tricks for perfect hibiscus braided tree indoors
Transforming your hibiscus into a braided tree is all about patience and precision—here's how to avoid common pitfalls and get the best results.
Stem Flexibility is Key: In Step 1, when trimming leaves from the lower 6-8 inches, don't rush this step. The goal is to create flexible stems that'll braid smoothly. If your stems feel stiff after trimming, try the hairdryer trick from Step 2—just 10-15 seconds on low heat makes all the difference. I've found that stems warmed this way bend nearly as easily as fresh cuttings, and they won't snap when you're creating those perfect X patterns every 2-3 inches.
Braiding Technique Matters: When you're crossing stems in Step 2, think of it like tying shoelaces. The first X pattern sets the foundation—if you get this wrong, the whole braid will look uneven. Here's my secret: hold the stems at the base with your non-dominant hand while working the crosses with your dominant hand. This gives you better control. Also, don't be afraid to adjust the spacing slightly between crosses if needed—some stems naturally grow at different angles, and flexibility here prevents future stress points.
Light Rotation Strategy: The 4-6 hours of direct sunlight mentioned in Step 4 is crucial, but don't forget the weekly quarter turn rotation. I've seen braids grow lopsided when people skip this step because one side gets more light. Set a reminder in your phone for this—it takes less than 30 seconds but makes a huge difference in creating balanced growth. For indoor grow lights, position them 12-18 inches above and rotate the plant daily if possible to prevent any leaning.
Winter Care Transition: When winter arrives and you're reducing watering to every other week, don't forget to adjust your fertilizer schedule too. The 55-65°F temperature range mentioned is perfect for dormancy, but hibiscus still need minimal nutrients. I switch to a half-strength fertilizer every 8-10 weeks during winter months. This small adjustment prevents nutrient burn while still supporting the plant's basic needs—your braids will thank you when spring arrives.
Pro Tips for Hibiscus Braided Tree Indoor
- Transforming your hibiscus into a braided tree is all about patience and precision—here's how to avoid common pitfall...
- Stem Flexibility is Key: In Step 1, when trimming leaves from the lower 6-8 inches, don't rush this step. The goal is...
- Braiding Technique Matters: When you're crossing stems in Step 2, think of it like tying shoelaces. The first X patte...
Frequently asked questions
Got questions about growing a hibiscus braided tree indoors? You’re not alone—this striking plant has a few quirks! Here are answers to the most common queries to help you cultivate a thriving, lush canopy in your small space.
How often should I prune my hibiscus braided tree to encourage braiding?
Prune your hibiscus every 4–6 weeks during the growing season (spring and summer) to shape the braids and encourage bushier growth. Use sharp, sterilized shears to trim just above a leaf node at a 45-degree angle. Avoid heavy pruning in winter, as the plant rests during colder months.
Can I keep my hibiscus braided tree indoors year-round, or does it need outdoor time?
While hibiscus trees can thrive indoors year-round, they prefer bright, indirect light (like a south- or west-facing window) and occasional outdoor exposure to boost blooming. If indoors only, supplement with a grow light 12–14 hours daily. Acclimate gradually to outdoor conditions in spring to avoid shock.
Why are the leaves yellowing or dropping, even with proper care?
Yellowing leaves often signal overwatering or poor drainage. Hibiscus roots need well-draining soil and water only when the top 1–2 inches are dry. Check for root rot by gently tugging on the plant—if it resists, it’s soggy! Adjust watering and repot in fresh, airy soil if needed.
Are there smaller hibiscus varieties better suited for braiding indoors?
Yes! Dwarf hibiscus varieties like 'Lilliputian' or 'Pixie' are ideal for indoor braiding, staying compact (3–5 feet tall). They’re also more forgiving for beginners. Avoid large tropical hibiscus (e.g., Hibiscus rosa-sinensis) unless you have space for their sprawling growth.
How do I fix uneven or messy braids after pruning?
Start fresh! Trim back all braids to 6–8 inches from the base, then retie them with soft plant ties or strips of fabric (avoid wire—it can damage stems). Space ties every 4–6 inches and gently twist the stems in a spiral as they grow. Patience is key—braids take 3–6 months to tighten naturally.
Wrapping up and next steps
Transforming your space with a hibiscus braided tree indoors isn’t just about aesthetics—it’s a celebration of patience, creativity, and the joy of nurturing life.
Whether you’re pruning for shape, encouraging bushier growth, or simply embracing the art of bonsai-style braiding, every snip and twist brings you closer to a stunning, space-friendly centerpiece. 🌿✨
Ready to dive in? Start by gathering your tools and choosing your hibiscus—then let your green thumb guide the way! Your indoor jungle awaits!