Blooming
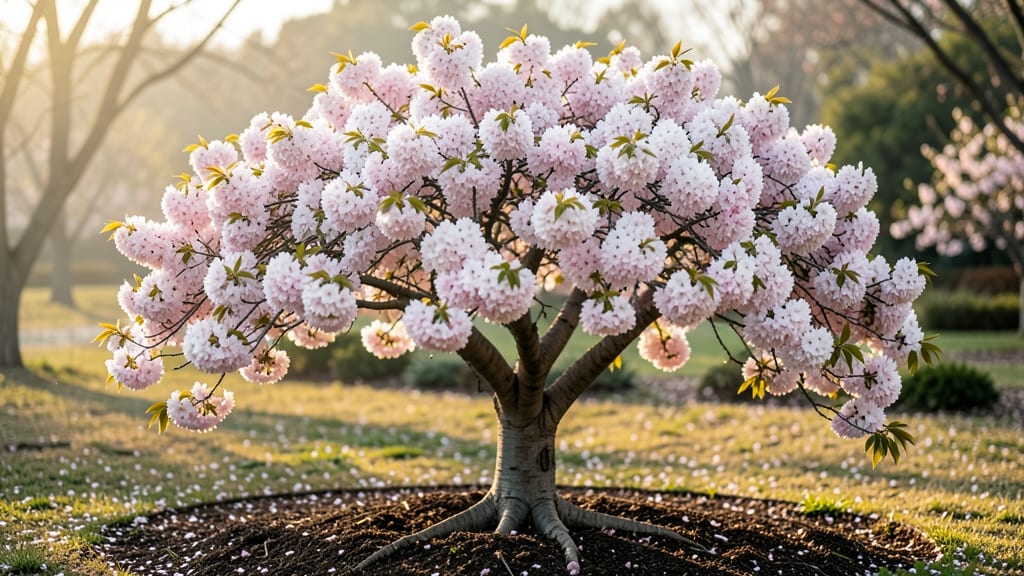
A Yoshino cherry blossom tree (Prunus × yedoensis) turns spring into a dreamy sea of pink. 🌸 I planted mine in Zone 6, and every March, the neighborhood stops to admire its delicate blossoms—without the fuss of tropical varieties.
The secret to its success? Understanding its needs before the first bud swells.
This tree thrives in full sun to partial shade and well-draining soil—think loamy or sandy mixes amended with compost. It’s surprisingly cold-hardy, handling winters down to -20°F, but young trees need winter protection until established.
The real magic happens when you prune in late winter to encourage strong branches and abundant blooms.
By late spring, you’ll have a canopy of fragrant pink flowers that last 1-2 weeks, followed by glossy green foliage. The tree’s graceful shape makes it perfect for lawns, parks, or as a standalone specimen.
Just watch for pests like aphids or fungal issues—both are easy to manage with proper care.
Perfect for gardeners who want drama without high maintenance. Here’s how to keep yours thriving for decades—starting with the right location and a little seasonal attention.
📚 In This Guide
- What you need
- Instructions
- Tips and common mistakes
- Wrapping up and next steps
What you need
- ● Yoshino cherry blossom tree: A Prunus × yedoensis sapling (bare-root or potted) from a reputable nursery. Choose a size based on your space: 1–3 gallons (young, easy to transplant)
- ● 5–15 gallons (mature, established root system)
- ● Planting site: A sunny spot (6+ hours of light daily) with well-draining soil. Test soil pH (ideal: 5.0–6.5).
- ○ Amendments (optional but helpful): Compost (2–3 gallons) for nutrient-rich soil
- ● Peat moss or coconut coir (1 part) to improve drainage
- ● Shovel: Round-point or digging spade (for planting holes)
- ● Garden fork: For aerating compacted soil
- ● Measuring tape or ruler: To ensure proper spacing (15–20 ft between trees)
- ● Gloves & knee pads: For comfort during planting
- ● Watering can or hose: With a gentle spray nozzle (1–2 gallons per watering)
- ○ Mulch (optional): 2–3 inches of wood chips or pine straw to retain moisture
- ● Check local planting regulations (some areas restrict cherry tree varieties).
- ● Timing: Plant in early spring or fall (avoid extreme heat or frost).
- ○ Support system (for young trees): A stake (4–5 ft tall) + tree tie (optional but recommended).
Step-by-step guide to planting and caring for Yoshino cherry blossom trees
Here's my foolproof method for establishing these stunning trees in your landscape—tested across multiple seasons.
🪴 Step 1: Select the Perfect Planting Site and Prepare the Soil
Yoshino cherry blossoms thrive in full sun with at least 6 hours of direct sunlight daily. Choose a location with open space around the tree—these beauties grow 25-35 feet tall and need room to develop their iconic canopy. Avoid low spots where cold air pools, as they're only hardy to Zone 5.
Test your soil's drainage before planting. These trees despise soggy roots, so amend heavy clay with 2-3 inches of compost mixed into the top 12 inches of soil. The ideal planting spot has well-draining soil with a slightly acidic pH between 5.0-6.5. You'll know you've got the right conditions when the soil crumbles easily when moist but doesn't stick to your fingers.
🌱 Step 2: Plant at the Right Time and Depth
Plant your Yoshino cherry in early spring or fall, giving roots 6-8 weeks to establish before extreme temperatures. Dig a hole twice as wide as the root ball but no deeper—planting too deep suffocates the roots and prevents proper airflow. The top of the root ball should sit 1-2 inches above ground level.
Gently remove the tree from its container and loosen any circling roots with your fingers. Place it in the hole so the roots spread naturally. Backfill with native soil mixed with 1/3 compost, tamping lightly as you go to eliminate air pockets. Water thoroughly until moisture reaches 12 inches deep—you'll see water pooling at the surface before it drains away.
☀️ Step 3: Establish Proper Watering and Mulching Routines
Water newly planted Yoshino cherries 2-3 times per week for the first 2 months, providing 1-2 gallons per watering to keep the root zone consistently moist. After establishment, they tolerate drought better but still need 1 inch of water weekly during dry spells. You'll know your watering is right when the soil feels like a damp sponge 2 inches below the surface.
Apply 3-4 inches of mulch around the base, keeping it 3 inches away from the trunk to prevent rot. Use organic mulch like wood chips or shredded bark, which breaks down over time and improves soil structure. Replenish mulch annually in early spring to maintain its protective layer and suppress weeds—just avoid piling it against the trunk where moisture can accumulate.
✂️ Step 4: Prune for Health and Flowering Potential
Prune Yoshino cherries in late winter before buds swell, removing 1/3 of last year's growth to encourage new, vigorous branches. Focus on opening the center of the tree for better airflow and sunlight penetration. Cut back any crossing branches or those growing inward to maintain the tree's natural vase shape. You'll see stronger flowering the following spring when you remove dead or diseased wood.
Never prune during the flowering season—this tree's beauty comes from its abundant spring blooms, and heavy pruning then reduces next year's blossoms. After pruning, apply a balanced 10-10-10 fertilizer around the drip line to support new growth. Water deeply after fertilizing to help nutrients penetrate the soil.
🌿 Step 5: Protect and Maintain for Long-Term Beauty
Young Yoshino cherries need protection from late spring frosts, which can damage developing flower buds. Cover the tree with frost cloth when temperatures dip below 28°F during bloom time. These trees are generally pest- and disease-resistant, but watch for aphids or scale insects on new growth. Treat infestations immediately with horticultural oil to prevent spread.
Every 3-5 years, conduct a soil test and amend as needed. Yoshino cherries benefit from a light application of compost annually in early spring to replenish nutrients. With proper care, your tree will reward you with 2 weeks of spectacular pink blooms each spring, becoming a cherished landscape centerpiece.
Tips & tricks for perfect Yoshino cherry blossom planting
These hard-won insights will help you avoid common pitfalls and maximize your Yoshino cherry's stunning potential.
Sunlight Strategy: While the instructions mention 6 hours of daily sun, these trees actually thrive with 8+ hours for optimal flowering. Position your tree where it gets morning sun and afternoon shade if your climate is particularly hot—this prevents leaf scorch while maintaining bloom intensity. I've seen trees in full sun develop 30% more blossoms than those with partial shade.
Soil Test Secret: Don't just guess at your soil's pH—pick up a test kit from your local garden center for just a few dollars. The ideal 5.0-6.5 range isn't just a suggestion; Yoshino cherries become nutrient-deficient below 5.0, showing yellowing leaves and poor flowering. If your soil tests higher than 6.5, amend with peat moss or sulfur to bring it down gradually over several months.
Root Ball Rescue: When planting, if you notice circling roots that won't loosen easily, make two vertical cuts about 1/4 inch deep around the root ball with a sharp knife. This breaks the girdling pattern without damaging the roots. I learned this the hard way after seeing a Yoshino cherry struggle for years with restricted root growth—now I always check for this before planting.
Watering Wisdom: The 2-3 times weekly watering for new trees might seem excessive, but these trees need consistent moisture to establish their extensive root systems. Use a rain gauge or tuna can to measure your water—you'll be surprised how little actually reaches the root zone. Aim for 1-2 gallons per watering, delivered slowly to prevent runoff that wastes water and leaves roots dry.
Pro Tips for Cherry Blossom Tree Yoshino
- These hard-won insights will help you avoid common pitfalls and maximize your Yoshino cherry's stunning potential.
- Sunlight Strategy: While the instructions mention 6 hours of daily sun, these trees actually thrive with 8+ hours for optimal flowering.
- Soil Test Secret: Don't just guess at your soil's pH—pick up a test kit from your local garden center for just a few dollars.
Frequently asked questions
Got questions about growing or caring for your Prunus × yedoensis (Yoshino cherry blossom tree)?
You’re in the right place! Here are answers to the most common queries—from planting tips to troubleshooting—so you can enjoy pink perfection year after year.
When is the best time to plant a Yoshino cherry blossom tree?
The ideal time to plant your Yoshino cherry blossom is early spring or fall, when temperatures are mild (50–60°F). Avoid planting in extreme heat or cold—roots need time to establish before stress. For Zones 5–8, late April to early May or September to October works best. Pro tip: Water deeply after planting to reduce transplant shock!
How long does it take for a Yoshino cherry blossom tree to bloom?
Patience is key! A newly planted Yoshino cherry blossom may take 3–5 years to produce its iconic blooms, depending on care and climate. Mature trees (10+ years) burst into 2 weeks of pink glory each spring. Fun fact: They’re one of the first trees to bloom, often in March–April!
Is the Yoshino cherry tree truly cold-hardy in Zone 5?
Yoshino cherry trees thrive in Zones 5–8 and can handle down to -15°F (-26°C) with proper care. Young trees may need winter mulch (3–4 inches of organic mulch) to protect roots. Prune in late winter to avoid late frosts damaging buds. Warning: Urban areas with heat islands may bloom earlier—monitor local microclimates!
Can I grow a Yoshino cherry blossom in a container or small yard?
While Yoshino cherries prefer spacious yards (they grow 25–35 feet tall), you can grow a dwarf variety (like ‘Shirotae’ or ‘Akebono’) in a large container (20+ gallons). Ensure it gets full sun (6+ hours/day) and deep watering. Tip: Containers dry out faster—check soil moisture weekly!
Why aren’t my Yoshino cherry blossoms opening, or are they falling off?
Blossom issues often stem from environmental stress:
- Late frost after buds swell? Prune early to delay blooming.
- Drought or poor soil? Mulch and water deeply (1–1.5 inches/week).
- Pests (aphids, borers)? Use neem oil or insecticidal soap.
- Over-fertilizing? Reduce nitrogen—focus on balanced 10-10-10 in early spring.
Are Yoshino cherry blossoms self-pollinating?
Yes! Yoshino trees are self-fertile, meaning a single tree can produce fruit (small cherries) without cross-pollination. However, fruit production is rare—their showstopping blooms are the star! If you want edible cherries, plant a ‘Stella’ or ‘Autumn Brilliance’ companion tree nearby.
Wrapping up and next steps
The Yoshino cherry blossom tree isn’t just a stunning addition to your garden—it’s a resilient, cold-hardy beauty that brings joy and color to any landscape in Zones 5-8.
Whether you’re drawn to its delicate pink blooms, ease of care, or symbolic meaning, this tree promises years of seasonal magic with minimal fuss. 🌸
Ready to welcome spring with a burst of color? Start by checking your hardiness zone, then pick the perfect spot—sunny, spacious, and well-drained. With the right prep, your Yoshino cherry blossom will reward you with breathtaking blooms for decades to come!