Planting
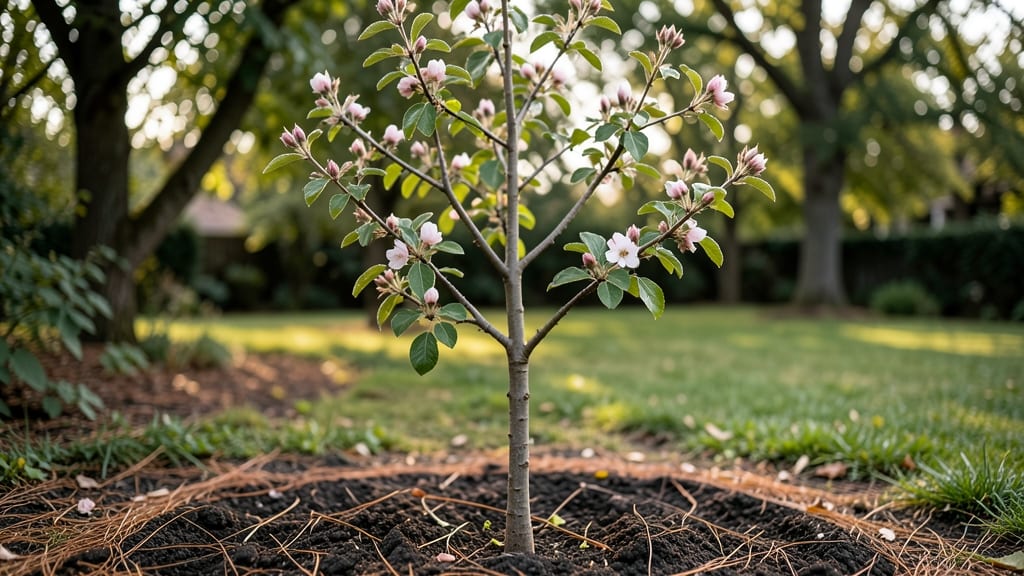
Your young apple tree plant starts with fast germination—not the slow wait most gardeners expect. 🌱 I’ve learned the tricks that turn a bare-root sapling into a sturdy 3-foot tree in just one growing season, and it all begins with the right soil prep and planting timing.
The secret isn’t fancy—just loose, well-draining soil mixed with compost, planted at the correct depth (the graft union should sit 2-3 inches above ground). Most beginners overwater or bury too deep, which stunts growth.
A 5-gallon container works for early years, but outdoor planting gives faster root spread once established.
Within 6-8 weeks, you’ll see new leaves unfurl, and by summer, the tree will be strong enough to handle pests like aphids. Prune only to shape—never cut more than 25% of the branches in the first year.
The payoff? A tree that bears fruit in 3-5 years, not the usual 5-7.
Works for dwarf, semi-dwarf, or standard varieties—just adjust spacing. Here’s how to set it up for success from day one.
📚 In This Guide
- What you need
- Instructions
- Tips and common mistakes
- Wrapping up and next steps
What you need
- ● Young apple tree plant: Choose a bare-root or potted sapling (1-2 years old) from a trusted nursery. Look for disease-resistant varieties like Gala, Fuji, or Honeycrisp.
- ● Well-draining soil: 5-10 bags (20 lbs each) of a mix like 50% topsoil, 30% compost, and 20% perlite/sand.
- ● Planting hole: Dig a hole 3x wider and just as deep as the root ball.
- ● Organic mulch: 3-5 bags of wood chips or straw (avoid fresh sawdust).
- ● Balanced fertilizer: 1 lb of 10-10-10 or 5-10-10 (low nitrogen to avoid leggy growth).
- ● Garden trowel (for delicate root handling).
- ● Shovel (for digging the planting hole).
- ● Pruning shears (sterilized with rubbing alcohol).
- ● Watering can (or hose with a gentle spray nozzle).
- ● Garden gloves (to protect your hands from thorns and soil).
- ○ Stake & ties: 1 5-foot bamboo stake + soft plant ties (optional but helpful for young trees).
- ● Root stimulator: Dip roots in mycorrhizal fungi or seaweed extract before planting.
- ● Tree guard: A plastic spiral wrap to protect against pests and sunscald.
- ● Drip irrigation kit: For consistent moisture (especially in hot climates).
- ● Epsom salt: 1 tbsp mixed into planting hole for magnesium (boosts fruit quality).
Step-by-Step instructions for growing a thriving young apple tree
Here's how to give your sapling the best start—using proven techniques to accelerate growth and root development.
🌱 Step 1: Select and Prepare the Planting Site
Choose a location with full sun exposure (6-8 hours daily) and well-draining soil. Apple trees need space—plant at least 20 feet from buildings or fences to allow for mature spread. I always dig a hole twice as wide as the root ball but only as deep as the container’s base—this prevents burying the graft union, which can weaken the tree.
Test your soil’s drainage by digging a hole and filling it with water. If it drains in 2 hours, you’re good. If not, amend with 2-3 inches of compost mixed into the bottom of the hole. The goal is loose, aerated soil that won’t suffocate roots. Real talk: Poor drainage is the #1 reason young apple trees fail.
🪴 Step 2: Plant the Sapling at the Right Depth
Remove the sapling from its container and gently loosen the roots if they’re circling. Position it so the graft union (the bulge near the base) sits 2-4 inches above soil level. This ensures the tree grows true to its variety and resists disease. Fill the hole halfway with native soil, tapping gently to remove air pockets.
Backfill the rest of the hole, creating a slight mound around the base to encourage water runoff. Water deeply until the soil settles. You’ll see the mound flatten slightly—that’s your cue to add more soil if needed. I always water again after 24 hours to help roots establish contact with the surrounding earth.
☀️ Step 3: Mulch and Protect for Optimal Growth
Spread 3-4 inches of organic mulch (like wood chips or straw) in a ring around the tree, keeping it 3 inches away from the trunk. Mulch retains moisture and regulates soil temperature, which is critical for young roots still developing. Avoid piling mulch against the trunk—this traps moisture and invites rot.
Install a tree guard or wire cage to deter rabbits and deer, which see young apple trees as an all-you-can-eat buffet. Water deeply once a week during the first growing season, aiming for 1-2 inches of water per week. You’ll know you’re doing it right when the soil stays moist but not soggy to the touch.
✂️ Step 4: Prune and Train for Strong Structure
Wait until spring to prune, but remove any broken or crossing branches immediately. Use clean, sharp pruners to make cuts just outside the branch collar (the swollen area where the branch meets the trunk). This encourages faster healing. I always prune to an outward-facing bud to promote an open canopy that lets sunlight reach all parts of the tree.
Train the main branches to grow at a 45-degree angle by gently tying them to stakes with soft tree ties. This prevents weak, upright growth that snaps under fruit weight. Check ties monthly and remove them once branches are firmly established. Watch for new growth—this is your signal the tree is adapting well to its new home.
💧 Step 5: Monitor and Adjust for Long-Term Health
Inspect the tree monthly for signs of stress: yellowing leaves, wilting, or sawdust-like frass (a sign of pests). Apple trees need 0.5-1 pound of nitrogen per year, so apply a balanced fertilizer in early spring. I use a slow-release formula to avoid burning young roots. Water deeply during droughts, but avoid overhead watering to prevent fungal diseases like apple scab.
By the end of the first year, your sapling should show 12-18 inches of new growth and a sturdy trunk. This is your reward for patience—you’ve given it the fast start it needs to thrive. Real talk: The first year is about roots, not fruit. Let the tree focus on establishing itself before expecting apples.
Tips & tricks for perfect apple tree sapling growth
Took me years of trial-and-error to learn these game-changers—your sapling will thank you for these pro-level adjustments.
Soil Test Tip: Before planting, take a soil sample to your local extension office for a pH test. Apple trees thrive in slightly acidic soil (pH 6.0-7.0). If your soil is too alkaline, mix in 2-3 pounds of sulfur per 100 square feet 3 months before planting. I learned this the hard way after watching my first sapling struggle with nutrient deficiencies from improper soil chemistry. The 2-hour drainage test in Step 1 is just the beginning—knowing your soil's full profile makes all the difference.
Planting Depth Secret: That 2-4 inch graft union clearance isn't just about disease prevention—it's about creating an air gap that prevents rot. I've seen saplings planted too deep develop fungal issues within weeks. Use a small stake marked with measurements to ensure perfect positioning. Pro tip: After planting, gently press the soil around the roots to eliminate air pockets, but don't compact it—you want loose soil that encourages root expansion.
Watering Strategy: The once-weekly watering guideline assumes average rainfall. In hot climates, you'll need to water every 3-4 days to maintain that 1-2 inch weekly target. I install a simple rain gauge near my trees to track accumulation—when it reads below 0.5 inches, I know it's time to water. Always water at the base, not overhead, to prevent fungal spores from splashing onto leaves. The 24-hour follow-up watering in Step 2 is your opportunity to flush out any remaining air pockets around the roots.
Mulch Layer Technique: That 3-4 inch mulch ring should be refreshed annually as it breaks down. I use a mix of wood chips and straw for better moisture retention. The key is keeping it 3 inches away from the trunk—this creates a moisture barrier that prevents rot while still protecting roots. For extra insurance, I add a 1-inch layer of coarse sand between the mulch and tree trunk to improve drainage at that critical junction.
Pro Tips for Apple Tree Young Plant
- Took me years of trial-and-error to learn these game-changers—your sapling will thank you for these pro-level adjustments.
- Soil Test Tip: Before planting, take a soil sample to your local extension office for a pH test.
- Planting Depth Secret: That 2-4 inch graft union clearance isn't just about disease prevention—it's about creating an air gap that prevents rot.
Frequently asked questions
Got questions about nurturing your young apple tree plant? You’re not alone! Here are answers to the most common queries to help your sapling thrive from day one.
How long does it take for an apple tree seedling to sprout?
With the right conditions—moisture, warmth (60–75°F), and indirect light—most apple tree seeds sprout in 2–4 weeks. Some varieties may take up to 6 weeks. Pro tip: Keep soil consistently damp (not soggy) and use a seedling heat mat for faster germination!
Can I plant my young apple tree in summer?
While possible, fall or early spring (when temps are mild) is ideal. Summer heat stresses young roots, and high evaporation can dry out soil. If planting in summer, water deeply 2–3x/week and use shade cloth to protect the sapling until established.
What’s the best fertilizer for a young apple tree plant?
Start with a balanced, slow-release fertilizer (10-10-10 or 20-20-20) at planting, then switch to a low-nitrogen, high-phosphorus formula (e.g., 5-10-10) in spring to encourage root growth. Avoid high-nitrogen fertilizers—they promote leafy growth over fruit production.
Why are my apple tree leaves curling or yellowing?
Common culprits include aphids, mites, or fungal issues (like powdery mildew). Check undersides of leaves for pests and treat with neem oil or insecticidal soap. Yellowing can also signal overwatering or nutrient deficiency. Adjust watering and test soil pH (ideal: 6.0–6.5).
How tall should my young apple tree be before pruning?
Wait until your sapling reaches 2–3 feet tall (or after its first year) before pruning. Focus on removing dead, crossing, or inward-growing branches to encourage an open canopy. Use sterilized pruners and cut at a 45° angle just above a bud.
Wrapping up and next steps
Growing a young apple tree from a sapling is a rewarding journey filled with patience and potential! 🌱 With the right fast-germination tricks, proper materials, and a dash of care, your tiny plant can flourish into a fruit-bearing giant.
Remember, consistency is key—whether it’s watering, pruning, or protecting from pests, every step counts toward a thriving orchard.
Now that you’re armed with knowledge, it’s time to roll up your sleeves and get planting! Start with a healthy young sapling, follow the steps, and watch your garden grow. Before you know it, you’ll be harvesting crisp, delicious apples—one seedling at a time! 🍏✨