Container Gardens
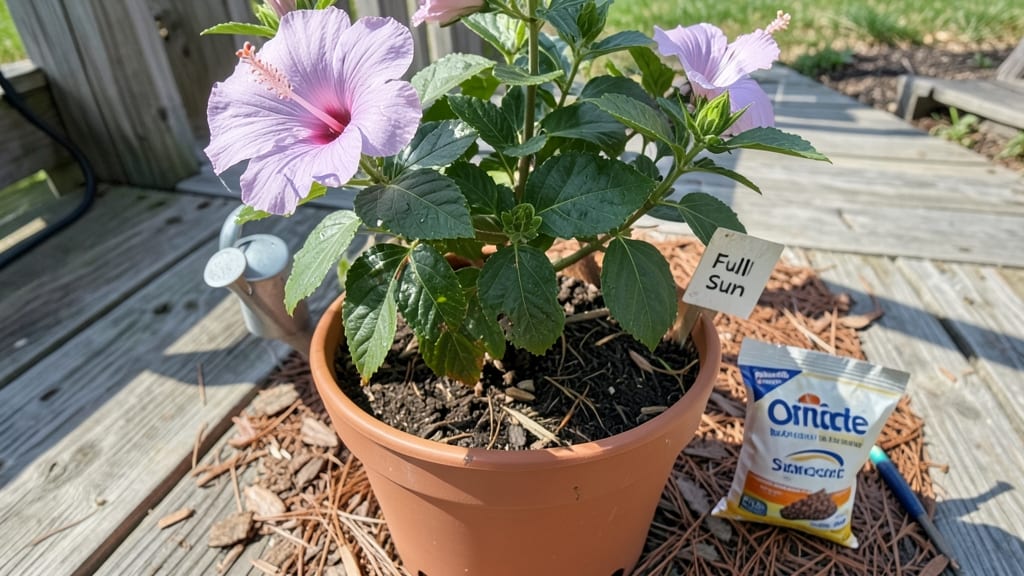
A hibiscus tree in a container brings bold tropical drama to patios, balconies, and small yards—without the space needs of its in-ground cousins. 🌺 After years of experimenting with different pots and soil mixes, I finally cracked the code for keeping mine lush, blooming, and compact through all four seasons.
The secret isn’t just the right container (though that helps)—it’s the combination of soil, water, and light that mimics its natural habitat while keeping roots happy in confined spaces.
You’ll need a container at least 18 inches wide and deep (larger for tropical varieties) with drainage holes—terracotta or fiberglass works best to prevent root rot. The soil mix should be 60% well-draining potting mix, 30% perlite or orchid bark, and 10% compost to feed those hungry roots.
Feed monthly with a balanced liquid fertilizer during spring and summer, then switch to a low-nitrogen formula in fall to encourage blooms. Humidity is key: mist the leaves daily or place the pot on a tray of pebbles with water to recreate the tropical air your hibiscus craves.
By summer’s end, you’ll have a 6-foot-tall (or taller, if you’re ambitious) tree bursting with 5-inch blooms in vibrant reds, pinks, or whites.
The foliage stays glossy and green, and with proper winter care—like moving indoors or wrapping the pot in burlap—your hibiscus will reward you with spring blooms that make all the effort worth it. The best part? No more wrestling with invasive roots or struggling to fit it in your landscape.
This method works for tropical hibiscus (Hibiscus rosa-sinensis) and hardy hibiscus (Hibiscus syriacus) with minor adjustments—just adjust winter care based on your zone. The biggest mistake beginners make? Overwatering or under-pruning.
We’ll cover those pitfalls (and how to fix them) in the next section, so you can avoid my early-season leaf-drop disasters. Ready to transform your space with year-round color?
📚 In This Guide
- What you need
- Instructions
- Tips and common mistakes
- Wrapping up and next steps
What you need
- ● Container: A large, well-draining pot (18–24 inches in diameter) with drainage holes. Pro tip: Terracotta or fiberglass pots help regulate moisture.
- ● Hibiscus plant: A healthy, dwarf or tropical hibiscus variety (e.g., Hibiscus rosa-sinensis or Hibiscus syriacus) from a nursery.
- ● Potting mix: A high-quality, well-draining blend (e.g., 60% potting soil, 30% perlite, 10% compost). Avoid heavy garden soil!
- ● Drainage layer: 2–3 inches of gravel, pebbles, or broken pottery at the container’s base.
- ● Fertilizer: A balanced, slow-release fertilizer (10-10-10 or 20-20-20) or organic options like fish emulsion or worm castings.
- ● Watering can or hose: With a gentle spray nozzle for even moisture.
- ● Pruning shears: Sharp, sterilized shears for trimming and shaping.
- ● Mulch: Organic mulch (e.g., pine bark) to retain moisture and suppress weeds.
- ● Plant supports: A small stake or cage for young hibiscus to encourage upright growth.
- ● Container saucer: To catch excess water and protect surfaces.
- ● pH testing kit: To monitor soil acidity (hibiscus prefers slightly acidic soil, pH 6.0–6.5).
- ● Slow-release fertilizer spikes: For hassle-free nutrient delivery.
Step-by-step guide to growing a vibrant hibiscus tree in containers
This method keeps your tropical hibiscus thriving year-round while controlling its size naturally.
🪴 Step 1: Select the Right Container and Drainage System
Choose a container at least 18-24 inches wide and deep—hibiscus roots need space to establish before flowering. I prefer unglazed ceramic or fabric pots because they breathe better than plastic, preventing root rot. Drill additional drainage holes if your pot lacks them; hibiscus roots suffocate in soggy conditions.
Line the bottom with 2-3 inches of gravel or broken pottery to create a reservoir. This ensures excess water drains away while keeping moisture available. Place a mesh screen over the holes to prevent soil from washing out while still allowing drainage. The right container setup prevents the #1 killer of potted hibiscus—root rot from poor drainage.
🌱 Step 2: Prepare the Well-Draining Potting Mix
Use a lightweight, airy potting mix blended with 20-30% perlite or pumice to improve drainage. I mix 50% premium potting soil, 30% perlite, and 20% compost for nutrients without compacting. Hibiscus hate soggy roots, so avoid garden soil—it compacts and traps moisture.
Fill the container 2/3 full, leaving room for root growth. Tap the pot gently to settle the mix without compacting it. The surface should look fluffy but firm enough to support the plant. Pre-moisten the soil until it feels evenly damp like a wrung-out sponge—not wet, not dry. This ensures the roots start in the perfect moisture balance.
☀️ Step 3: Plant and Position for Maximum Sunlight
Remove the hibiscus from its nursery pot and loosen the root ball gently to encourage spreading. Place it in the center of your container, ensuring the top of the root ball sits 1 inch below the rim. Fill the sides with your prepared mix, pressing lightly to eliminate air pockets.
Hibiscus need full sun—6+ hours daily—to produce blooms. Place your container in a south-facing spot or under bright grow lights if indoors. You’ll know it’s getting enough light when new leaves are deep green and glossy, not pale or stretched. Leggy growth means more light; yellowing leaves mean it’s getting too much afternoon sun in hot climates.
💧 Step 4: Water Deeply and Establish a Consistent Routine
Water deeply until it drains from the bottom, then wait until the top 2 inches of soil feel dry before watering again. Hibiscus roots need consistent moisture but hate soggy conditions. I use a moisture meter to check—aim for 60-70% humidity in the root zone. Overwatering causes yellow leaves; underwatering causes buds to drop.
During the growing season (spring-fall), fertilize every 2 weeks with a balanced liquid fertilizer (10-10-10 or 20-20-20). In winter, reduce to monthly feedings—hibiscus rest then, and over-fertilizing stresses them. You’ll see the difference: bold blooms in spring mean you’ve nailed the feeding schedule.
✂️ Step 5: Prune for Shape and Encourage More Flowers
Prune right after flowering to shape the tree and encourage bushier growth. Cut back 1/3 of the oldest stems to the nearest leaf node, and trim any leggy branches to just above a set of leaves. This prevents the hibiscus from growing too tall for its container and promotes denser foliage and more blooms.
Remove wilted flowers regularly—this prevents seed formation and redirects the plant’s energy into new blooms. I also pinch back new growth tips in early summer to encourage branching. You’ll notice fuller growth and more flowers within 6-8 weeks of pruning. Just avoid heavy pruning in fall—hibiscus need time to harden off before winter.
Tips & tricks for perfect container-grown hibiscus
These pro strategies will help your potted hibiscus thrive year-round with minimal fuss.
Container Selection: If you're limited to smaller containers, choose a 18-inch diameter pot and opt for dwarf hibiscus varieties like 'Pixie' or 'Little John'—they're bred specifically for compact growth. For larger pots, add 2-3 inches of extra gravel at the bottom to create a deeper reservoir, which helps maintain moisture during hot spells. Unglazed ceramic pots work best because they allow airflow to the roots, preventing that dreaded root rot.
Soil Science: The 50-30-20 mix of premium potting soil, perlite, and compost is non-negotiable for hibiscus. I've found that adding a handful of worm castings to the mix gives an extra nutrient boost without compacting the soil. When pre-moistening, squeeze a handful—it should hold together but not drip. Too wet, and you're inviting root issues; too dry, and you'll stress the plant during transplanting.
Lighting Hacks: For indoor growers, position your hibiscus within 3 feet of a south-facing window during winter months when daylight is shorter. If you notice leaves stretching toward the light (a sign of etiolation), supplement with a full-spectrum LED grow light for 12-14 hours daily. Rotate the pot weekly so all sides get equal light exposure—this prevents lopsided growth and ensures that vibrant deep green, glossy leaves we all love.
Pruning Precision: When you're cutting back those 1/3 of oldest stems in Step 5, always make clean cuts at a 45-degree angle just above a leaf node. This encourages new growth from the right spot. I use sharp pruning shears dipped in rubbing alcohol between cuts to prevent spreading disease. For the 6-8 week recovery period, avoid heavy feeding—let the plant focus on regrowing rather than producing blooms.
Pro Tips for Hibiscus Tree In Container
- These pro strategies will help your potted hibiscus thrive year-round with minimal fuss.
- Container Selection: If you're limited to smaller containers, choose a 18-inch diameter pot and opt for dwarf hibiscus varieties like 'Pixie' or 'Little John'—they're bred specifically for compact growth.
- Soil Science: The 50-30-20 mix of premium potting soil, perlite, and compost is non-negotiable for hibiscus.
Frequently asked questions
Got questions about growing a hibiscus tree in a container?
You’re not alone! Here are some of the most common concerns—and their solutions—to help you nurture a thriving, compact hibiscus year-round.
How often should I water a potted hibiscus tree?
Water your hibiscus when the top 1–2 inches of soil feel dry to the touch. In hot weather, this could mean daily watering, while cooler months may require less. Pro tip: Use well-draining soil and a pot with drainage holes to prevent root rot. Overwatering is the #1 killer of container hibiscus!
Can hibiscus trees survive winter in a container?
Yes, but they need protection! Move your pot to a sheltered spot (like a garage or under an eave) when temps drop below 50°F (10°C). Wrap the pot in bubble wrap or burlap for extra insulation. If you’re in a harsh climate, consider bringing it indoors near a sunny window. Bonus: Prune lightly before winter to reduce stress.
What’s the best container size for a hibiscus tree?
Aim for a pot at least 12–18 inches wide with drainage holes—hibiscus roots need room to spread but hate soggy feet. For dwarf varieties, a 10-inch pot works, but upgrade as the plant grows. Warning: Too-small pots = stunted growth and poor blooms.
Why aren’t my hibiscus leaves yellowing or dropping?
Yellow leaves or leaf drop usually signal overwatering, nutrient deficiency, or pests (like spider mites). Check for:
- Overwatering: Let soil dry slightly between waterings.
- Nutrients: Feed with a balanced fertilizer every 4–6 weeks in spring/summer.
- Pests: Spray with neem oil or insecticidal soap if you spot webs or tiny bugs.
How do I encourage more blooms on my container hibiscus?
Blooms thrive with sunlight, pruning, and fertilizer! Place your hibiscus in full sun (6+ hours daily), prune spent flowers, and feed with a high-phosphorus fertilizer (like 10-20-10) every 2–3 weeks in blooming season. Pro move: Deadhead regularly to redirect energy to new flowers.
Are there hibiscus varieties better for containers?
Dwarf varieties like ‘Lil’ Kim’ or ‘Peppermint’ stay compact (3–5 ft tall), while ‘Dwarf Tropical Red’ is perfect for small spaces. For tropical flair, try Hibiscus rosa-sinensis—just give it extra winter care. Tip: Check tags for “container-friendly” labels when shopping!
Wrapping up and next steps
Growing a hibiscus tree in a container is a rewarding way to bring bold beauty and tropical charm to any space—whether you're a seasoned gardener or just starting out! 🌺 With the right pot, soil, and care, you’ll enjoy vibrant blooms year-round, even in small balconies or patios.
The key is consistency: watering wisely, pruning thoughtfully, and protecting your plant from harsh elements when needed.
Now that you’re armed with tips and tricks, why not take the first step today? Pick your favorite hibiscus variety, grab a container, and let your green thumb shine! Your future self—and your neighbors—will thank you for the stunning, low-maintenance centerpiece. Happy planting! 🌿✨